Archive
How to configure Incoming E-Mail in SharePoint Server 2007 with Exchange Server 2007 (Part 2)
In my previous post, you should configure incoming e-mail for lists and document libraries without issues.
However, there are still some issue on configuration e-mail distribution group, let us review the settings step by step.
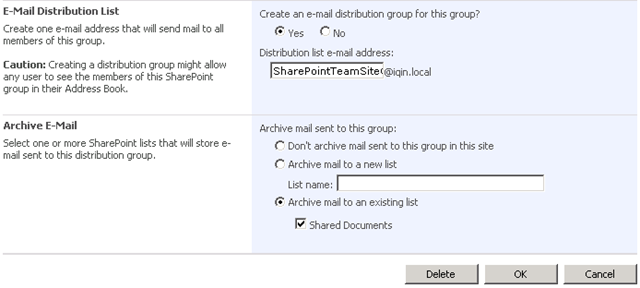
First navigate to People and Groups > Change Group Settings Page, you will see two new sections available for configuration.
However, if you enabled E-Mail Distribution List, you will see an error like this:
Very annoying, the cause of the issue is that there are some bugs in SharePoint DMS. you need to manually grant the Portal Site Application Pool account with at least Design permission on Distribution Groups list through Central Administration > Operations > Topology and Services > Approve/reject distribution groups (Lists/Distribution%20Groups)
See my previous post for more information:
Fixed: Email enabled list requires admin rights on SharePoint server when using DMS
After that, you could enabled E-Mail Distribution List for SharePoint groups successfully.
Then a record created in Distribution Groups list.
Approved it.
A corresponding Distribution Group was created in AD.
The same with the Contacts created by SharePoint DMS, the Distribution Group was not e-mail enabled. you need to add email address in Exchange Server manually.
Find the Distribution Group in your Exchange Server, checked Automatically update e-mail address based on e-mail address policy if you had a pre-defined policy, or using Add button to add email address manually.
Now, the e-mail enabled SharePoint group was created.
Tried to add a new user in this group.
Fair enough, another error :(.
luckily, this time I got some more information on ULS logs:
w3wp.exe (0x0F58) 0x0F60 Windows SharePoint Services Topology 8zrj High System.UnauthorizedAccessException: General access denied error at System.DirectoryServices.Interop.UnsafeNativeMethods.IAds.SetInfo() at System.DirectoryServices.DirectoryEntry.CommitChanges() at Microsoft.SharePoint.EmailIntegration.SPEWSADManager.ChangeUsersMembershipInDistributionGroup(String Alias, String[] AddNt4NameList, String[] DeleteNt4NameList, Boolean DeleteAllCurrentMembers)SPEWSADManager::ChangeUsersMembershipInDistributionGroup
w3wp.exe (0x0F58) 0x0F60 Windows SharePoint Services Topology 8zrk High Deleting all members for distribution group SharePointTeamSiteOwners
Well, permission issue. Double checked Configure Active Directory, all permissions are correctly delegated.
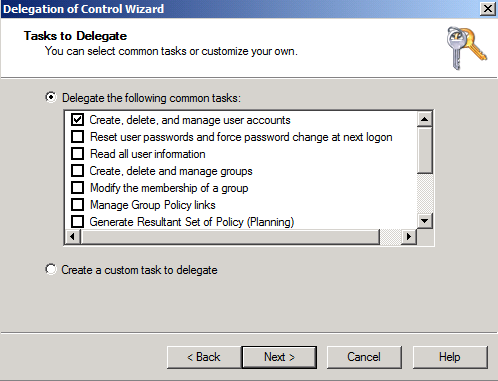
I checked the permission again. I noticed the Modifying the membership of a group should be checked as user should be added to the Distribution Group in AD.
I delegated the permission for both Portal Site Application Pool and Central Administration Site Application Pool account, save it.
Finally, the user was successfully added.
The user also sync to AD. all done!
Something more:
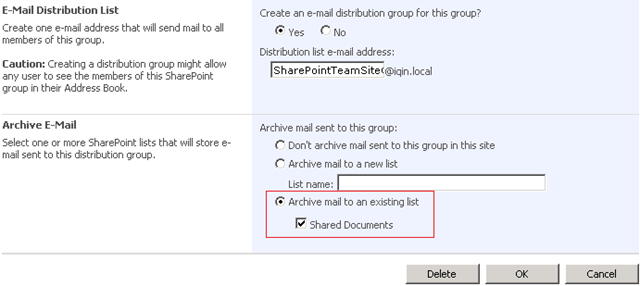
How Archive E-Mail worked?
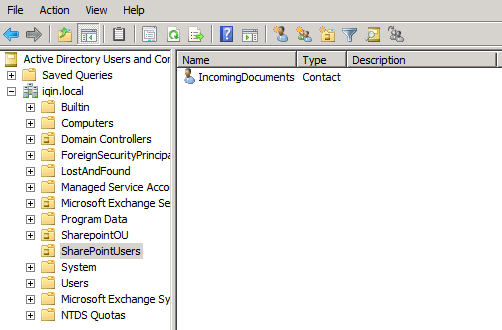
If you checked the archive mail to a list, the corresponding contact in AD was added to the Distribution Group.
If you did not check the archive mail to a list, the corresponding contact in AD was NOT added to the Distribution Group.
Because the e-mails sent to Distribution Group were also delivered to the account, the e-mail would be sent to the list and “archived” in the same list.
How to configure Incoming E-Mail in SharePoint Server 2007 with Exchange Server 2007 (Part 1)
There are two important parts of mail settings in SharePoint, Outgoing E-Mail and Incoming E-Mail.
Both parts are very simple in SharePoint side, but incoming e-mail settings are somewhat complex because Exchange Server configurations are involved.
Environment:
DC & DNS: pdc.iqin.local
Exchange 2007 Server: mail.iqin.local
SMTP Service in SharePoint Server: smtp.iqin.local
Service Account:
Central Administration Site web application pool: iqin\CentralAdminPool (domain account, Local Administrators group for every SharePoint server)
Portal site web application pool: iqin\PortalPool (domain account, no manually configuration needed)
Most of the configuration steps are included in official tutorials: Configure incoming e-mail settings (Office SharePoint Server), please make sure you have read the article before going on.
In this article, I suppose you have already configured Outgoing E-Mail in your farm. there is no need to give any explanation on how to install SMTP. OK, go on.
Part 1: Configurations in SharePoint Central Administration Site.
Enable Incoming E-Mail globally through Central Administration > Operations > Incoming E-Mail Settings.
make sure the Domains settings of SMTP matches the SMTP mail server for incoming mail.
Notice: If you forget to create the OU in the AD, the following error would occur.
Part 2: Delegate permissions in Active Directory.(For detailed permissions, please refer to: Configure Active Directory)
Snapshots on delegating Portal Site Application Pool and Central Administration Site Application Pool account:
Snapshots on delegating Central Administration Site Application Pool account:
After delegation completed, the Incoming E-Mail settings should be enabled without issues.
A corresponding contact was created by the DMS.
You will notice that No E-Mail address is generated, see my other blog if are interesting in the cause: There is no E-Mail addresses associated with AD Contacts created by DMS in Exchange 2007 domain
Set the E-Mail address in Exchange Server manually.
Part 3: Add Send Connector to route the mail back to SharePoint.
The mail send to Exchange Server should be route to the SMTP service so that SharePoint will pick up the mail from Drop folder.
If choosing Use MX records, you need to specify MX record in the DNS. otherwise, specify you own.
Part 4: Allowing E-Mails to relay through the SMTP service on SharePoint Server.
Incoming E-Mail uses SMTP server as a relay, you need to make sure the Exchange server has the permission to relay through the SMTP.
I allow all the computer to relay through the SMTP for demo purpose.
Final Part: Testing.
In the next part, I will demo how to create an e-mail distribution groups for SharePoint groups. 🙂
There is no E-Mail addresses associated with AD Contacts created by DMS in Exchange 2007 domain
This is by design behavior.
The contact created through SharePoint DMS is directly created in Active Directory, and The contact created in Active Directory directly , is just a contact. It is not mail-enabled.
With Exchange Server 2003, When SharePoint creates a contact, the RUS (Recipient Update Service) which runs every 5 minutes detects the new user and maps to the mail attribute.
However, in Exchange Server 2007, there is no RUS that automatically runs and detects new objects.
Until the email address policy is manually applied , the email address is not manually stamped on contact created through SharePoint.
The only workaround is that create a contact through SharePoint and apply the email address manually.
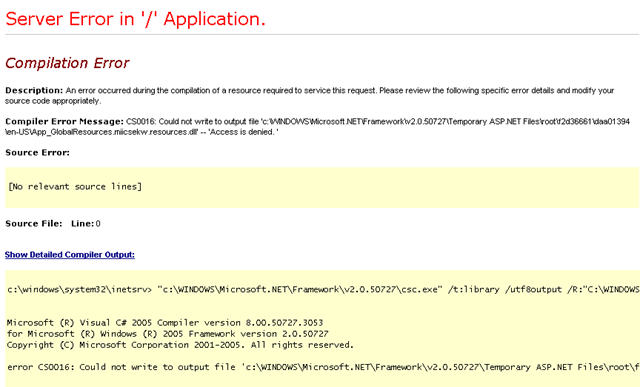
“Server Error in ‘/’ Application: Compilation Error” when launching a SharePoint site.
Scenario:
SharePoint installation and configuration completed without error. Central Administration site opened OK, I create a new web application as well as a new site collection, when I navigated to the site collection, I got an ugly error:
Well, I disabled Custom Error, restart IIS and got more information on what happened.
Full error in the Event Viewer is as follows (I bold the information may be useful for troubleshooting ):
Event Type: Warning
Event Source: ASP.NET 2.0.50727.0
Event Category: Web Event
Event ID: 1310
User: N/A
Description:
Event code: 3007
Event message: A compilation error has occurred.
Event ID: 5d6f99e3be054d25a032e6e7abf3c999
Event sequence: 3
Event occurrence: 1
Event detail code: 0
Application information:
Application domain: /LM/W3SVC/919155950/Root-5-129078447722055050
Trust level: WSS_Minimal
Application Virtual Path: /
Application Path: C:\Inetpub\wwwroot\wss\VirtualDirectories\portal.iqin.local80\
Machine name: IQIN-DEV07
Process information:
Process ID: 3560
Process name: w3wp.exe
Account name: IQIN\PortalPool
Exception information:
Exception type: HttpCompileException
Exception message: (0): error CS0016: Could not write to output file ‘c:\WINDOWS\Microsoft.NET\Framework\v2.0.50727\Temporary ASP.NET Files\root\f2d36661\daa01394\en-US\App_GlobalResources.vhjlfsch.resources.dll’ — ‘Access is denied. ‘
Troubleshooting:
As the exception message indicated, I checked the output file. It did not exist as I expected.
Then I checked the Temporary ASP.NET Files folder permission, it is OK, the group IIS_WPG which contains IQIN\PortalPool account had properly permissions.
I was confused here, and I decided to capture a Process Monitor trace to see how csc.exe worked in this case.
Opened the Process Monitor > start a capture > refresh the page > error occurred > stop the capture.
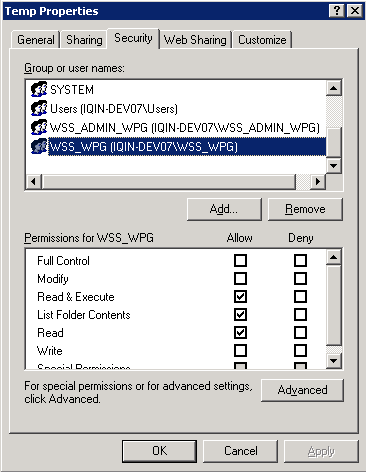
Wow, the ‘Access is denied’ is threw out at C:\Windows\Temp (%TEMP% or %TMP%) folder.
Quick check the permissions on that folder. Here it is, WSS_WPG group which contains IQIN\PortalPool account did not have Write permission on the folder.
Add Write and Modify permissions on the folder, issue resolved!
Display Name issue on SharePoint Alerts
If you are not familiar with how to configure outgoing e-mail settings in SharePoint, please read How to configure outgoing mail in SharePoint Server 2007 with Exchange Server 2007 first.
With the default configuration explained in above article, you will receive the following alert mails:
1. When you are added to a SharePoint Group, you will receive an alert like:
- Please notice that the Display Name of From address is the same with the Outgoing E-Mail Settings: From address.
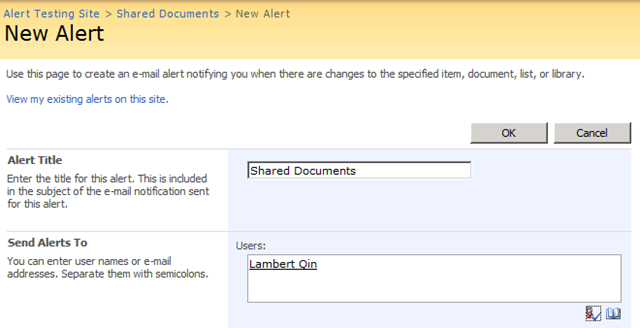
2. When you subscribe an alert from SharePoint lists, you will receive an alert like:
- please notice that the Display Name of From address is the same with the Site Title.
Event if you add a Distribution Group in Exchange Server and set the display name, the Display Name of alert mails will not changed.
Here is the question: How could I changed the Display Name of alert mails? Is it possible?
Yes, it is possible. The cause is the alert mails were relayed to Exchange Server anonymously.
All the versions of Exchange Server do not try to resolve the sender of the message when message is sent anonymously while the recipient is always resolved as we have to deliver email to him .
If the message is sent to Exchange Server using authentication, Exchange would try to resolve the sender against an object in AD and change the Display Name if it exists on the object.
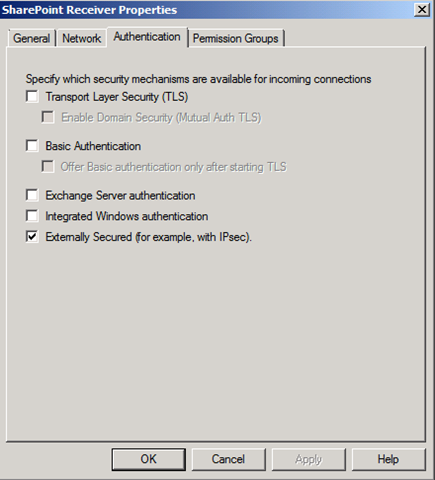
Therefore, if you want to change the Display Name of alert mails, try to configure Exchange use Externally Secured Connector.
Here is the configuration steps:
1. Create a Receive Connector using default settings.
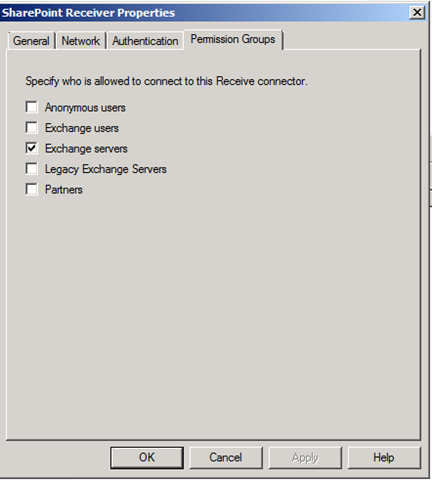
2. Double click Receive Connector, switch to the Permission Groups tab, check the Exchange Server, click Apply.
3. Switch to the Authentication tab, check the Externally Secured, click Apply.
4. After configured the settings, you have complete trust the previously designated IP addresses.
Now, make some tests, you will find that Exchange would resolve the sender against an object in AD.
Enjoy changing the Display Name to whatever you like 🙂
How to configure outgoing mail in SharePoint Server 2007 with Exchange Server 2007
This is an official tutorials helps you to Configure outgoing e-mail settings (Office SharePoint Server), this article tells you how to configure the outgoing mail in SharePoint side, but do not tell what you should do after the mail relayed from SMTP service.
This article gives you a step by step configuration on how to configure outgoing mail in SharePoint Server 2007 with Exchange Server 2007 in the same domain.
Environment:
DC & DNS server: dc.iqin.local
SMTP service: smtp.iqin.local
Exchange Server: mail.iqin.local
Let us start.
1. Support you have installed SMTP service on your SharePoint Server.
2. Create a new domain and specify the domain type to Remote, type the domain name based on your real environment (in my sample, it is iqin.local)
- Notice: you could edit the default Local domain to achieve the same goal, but I prefer to leave the default setting alone.
3. Double click to open the domain Properties dialogue.
- if you have a MX record in your DNS server, leave the all the setting to default. otherwise, please choose Forward all mail to smart host and specify the correct host name for your mail server.
4. Click Outbound Security button, make sure you click the Anonymous access option.
5. Click OK two times and save the changes, now you finished settings in SMTP service.
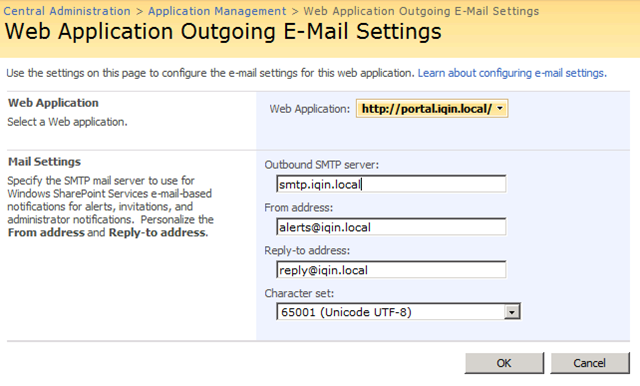
6. Navigate to Central Admin Site, configure the Outgoing E-mail Settings to use the SMTP service you just configured.
- Notice: the web application level Outgoing E-Mail Settings can override the global settings.
7. Click OK and finish the settings in SharePoint Site.
8. Because the relayed mail is sent by SMTP anonymously, a Receive Connectors which allows anonymous users is needed.
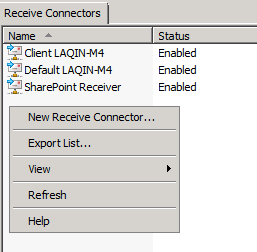
Right click the Receive Connectors tab area, click New Receive Connector, and fill the information based on your real environment.
Edit the Receive Connector Properties, make sure the Anonymous users is checked.















![image_thumb[11] image_thumb[11]](https://lambertqin.wordpress.com/wp-content/uploads/2010/01/image5b235d7b8c7a15.png?w=584&h=167)
![image_thumb[13] image_thumb[13]](https://lambertqin.wordpress.com/wp-content/uploads/2010/01/image5b275d53c19e52.png?w=410&h=456)
![image_thumb[15] image_thumb[15]](https://lambertqin.wordpress.com/wp-content/uploads/2010/01/image5b315d4e5f3f7c.png?w=390&h=399)

![image_thumb[17] image_thumb[17]](https://lambertqin.wordpress.com/wp-content/uploads/2010/01/image5b355d25877869.png?w=445&h=392)
![image_thumb[19] image_thumb[19]](https://lambertqin.wordpress.com/wp-content/uploads/2010/01/image5b395d3e8f5a7c.png?w=449&h=498)
![image_thumb[5][1] image_thumb[5][1]](https://lambertqin.wordpress.com/wp-content/uploads/2010/01/image5b115d5b15d.png?w=668&h=346)
![image_thumb[7][1] image_thumb[7][1]](https://lambertqin.wordpress.com/wp-content/uploads/2010/01/image5b155d5b15d.png?w=538&h=106)